

My goodness.
When was the last time I had a DIY post on here.
It's been a hot minute that's for sure.
There's a story behind this DIY like any good blog post should start.
First, let's review my musts for a DIY.
A good DIY means it costs significantly less than the original.
It does not take years to recreate and lastly,
it must NOT LOOK LIKE A DIY. Meaning, if it can't be finished off and used and look like it belongs in the space it was intended, then it isn't a DIY I am particularly interested in.
The lamp.
The lamp.
It started with a poor covid pickup.
This lamp was found on marketplace and advertised as a solid brass lamp.
Solid brass lamp needing new shade. Start the car.
During covid, many "sellers" have required payment prior to pickup so there is no money exchange. Fine, money sent.
Insert giant snow storm, frigid temps and me going to pick up said lamp on a delivery run for the store. The woman opened the door , threw me the lamp and slammed the door in my face while I was still saying hello
[and wearing my mask like a responsible girl].
I looked down and to my dismay the lamp was metal and not brass with a chipped finish she hid in the photos. It was gold chipped and a cheap lamp and not at all what I thought I paid for.
She knew this I'm quite sure as she had pulled all the curtains and ran from the door. Whatever, my fault for also not asking.
Into the car it went and onto the shelf to stare at me.
A few months later, I started seeing all these posts of people using mud to transform cheap finds and make a pretty decent copy of a 400.00 lamp.
I know they are in excess of 400.00 because they have been on my wishful thinking list as well.
Mud eh?
Well I did have the lamp just sitting there.........
So let's DIY this bad boy and see what happens.
All I would be wasting is my time.
Mud I have and spray paint....well I have a bit of that too.
Here's what I started with.

Gold painted metal lamp.
I wrapped the cord in painters tape and bagged the harp.
First, 2nd and 3rd coat:
Spray texture stone finish paint
from Canadian Tire [or similar store] in mineral brown but really the colour does not matter, you just need the texture.

4th, 5th coat:
I went the faster route with chalk spray paint. Most of the other DIYers with patience are using real chalk paint from a can and even mixing baking soda in and brushing it on.
I did not find this step necessary howeve,r if you have the patience go right ahead with the painting in that method.

Alright, after everything is dry you are ready to get dirty. Right out in the backyard, grab a good handful of mud. For the full instruction followers I'd say about a cup of mud and slowly add and stir in water until you get a smooth non chunky cake batter consistency.

I did not find this step necessary howeve,r if you have the patience go right ahead with the painting in that method.
Alright, after everything is dry you are ready to get dirty. Right out in the backyard, grab a good handful of mud. For the full instruction followers I'd say about a cup of mud and slowly add and stir in water until you get a smooth non chunky cake batter consistency.
Don a pair of gloves and rub it all over the lamp.
We haven't gotten to the good part yet where I explain to you that I
did this DIY on this lamp twice so trust me when I say you can fully get away with a thin layer of mud. It does not need to be caked on.
did this DIY on this lamp twice so trust me when I say you can fully get away with a thin layer of mud. It does not need to be caked on.
I hired myself a small helper for this. It's a great DIY to get a little one involved. My little mud puppy had a great time.

Allow everything to really dry. Overnight is probably good unless it's a nice sunny day and everything is sitting outside.
Now you need an old rag, a bowl of water and a scrubby pad.
Use the rag and bowl of water to lightly take off the mud to reveal the lamp underneath.
Tips:
1. Don't keep the rag sopping wet. Just kitchen counter wiping wet.
2. Don't rub super hard. You may lift your paint off to the original lamp if you push too hard. Slow and steady.
3. Allow lamp to dry after the initial wiping to see if you need to take off more mud or move onto the next stage of gently scrubbing off.
I used a scrunge pad like a sanding block after the lamp had dried from the water stage. Actual sanding would have been too rough and you just need to smooth down any thicker areas or reveal more of the paint underneath at this point.
Now here's where I got suppppper duper smart.
Now here's where I got suppppper duper smart.
I thought well why not take this one step further and seal this up so it's not just mud on the outside and the lamp is completely finished. Well I bought clear flat sealer and the second I finished the first spray I knew it wouldn't work in this case.
It gave the entire lamp a wet look and destroyed the aged appearance.
Back to stage 2.
I re-chalk painted and re-mudded and then stopped after I got the look I was after.
It gave the entire lamp a wet look and destroyed the aged appearance.
Back to stage 2.
I re-chalk painted and re-mudded and then stopped after I got the look I was after.
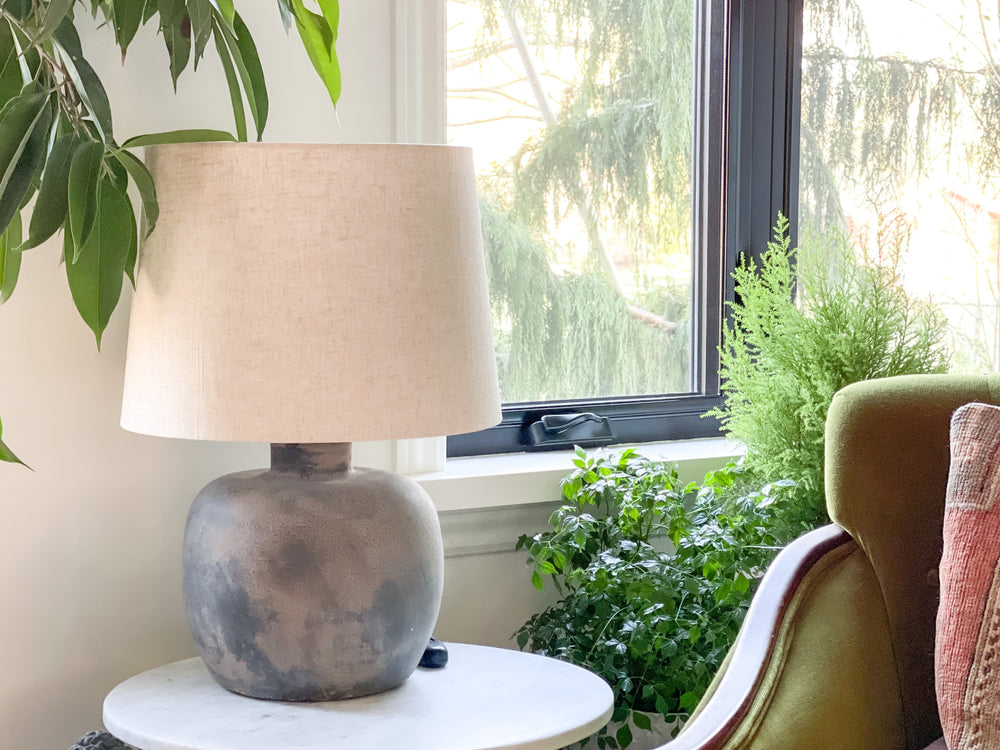
The lamp pickup gone wrong is happily sitting in my living room wearing a large linen shade and I think it's a DIY gone right now.

The above photo had the lamp with a taller harp. I went into my lamp repair box and grabbed a smaller one to drop the shade lower to really achieve the effect I was going for.

You can really see the finish up close in this photo.
I didn't really take a wide angle of the lamp in the room as my plant hoarder tendencies are getting ready for our spring patio setups and are in full swing in this corner of the room. The plants are everywhere near the windows just waiting to go outside.
All in all, for a DIY it hit all the boxes.
The above photo had the lamp with a taller harp. I went into my lamp repair box and grabbed a smaller one to drop the shade lower to really achieve the effect I was going for.
You can really see the finish up close in this photo.
I didn't really take a wide angle of the lamp in the room as my plant hoarder tendencies are getting ready for our spring patio setups and are in full swing in this corner of the room. The plants are everywhere near the windows just waiting to go outside.
All in all, for a DIY it hit all the boxes.
It looks good.
Cost significantly less.
Was fun to do.
I chalk that up to a job well done.
Have a great day everyone,


Comments
Meg you did a fantastic job…..love it and will definitely give it a try.
Wow! You nailed it-
Gorgeous